
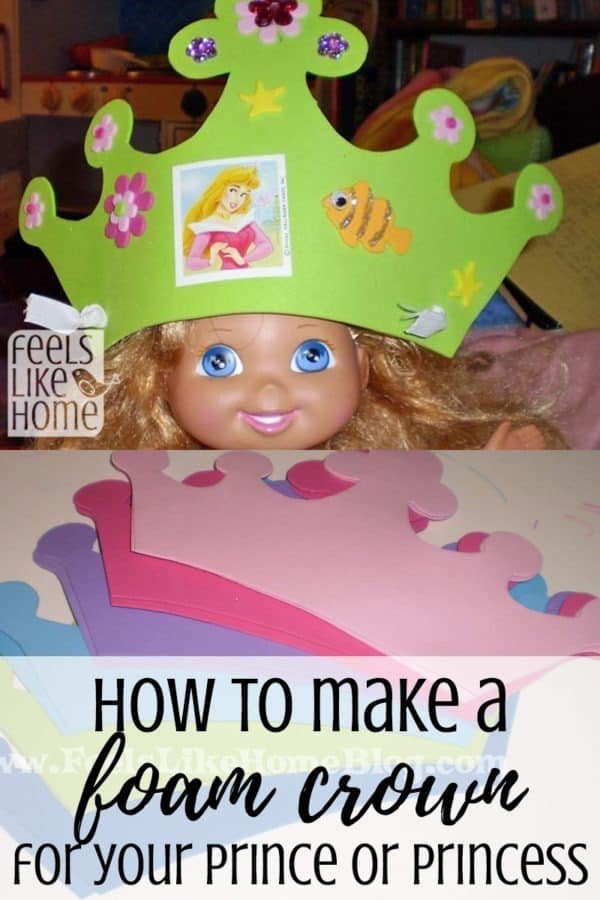
Earlier in the week, I mentioned that we made foam crowns at Grace's princess birthday party.

Some of the kids wore their crowns for the entire party. A few more wore their crowns on and off, and a couple of them wanted to take them home to hang on the wall.
Needless to say, the crowns were a big hit.
Before the Princess Party

A few days before the party, I gathered the supplies I'd need to cut out the crowns. I had:
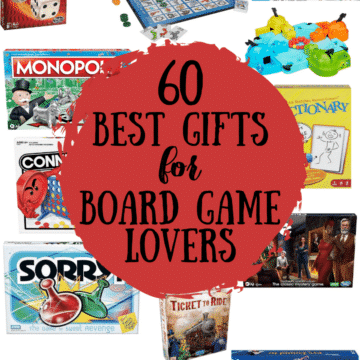
- 12 large pieces of craft foam in various colors
- A crown template - Because boys and girls were going to make crowns, I selected one that was neither feminine nor masculine. I saved it, cut it out, and taped the two halves together. (This is no longer available, so you will have to find one on Pinterest. Search for "crown template.")
- A marker to trace the template
- Scissors

The night before the party, I traced the template on each sheet of foam.

When I had them all traced, Joe and I started cutting them out. I wish I'd picked something with more angles and less circles, because it was annoying to cut out all of those circles.

At the Princess Party
All the kids had to do at the party was decorate their crowns, and their parents tied elastic to secure them to the kids' heads. It was simple and easy!

Materials for the Princess Crown Assembly
Here are the supplies I had available: (Pretend that I took this picture before the kids used half of the supplies, okay?)
- Foam stickers in a variety of themes - hearts & stars (These are glittered!), flowers, animals, ocean creatures
- Stick-on jewels
- Sequins
- Googly eyes
- Princess stickers
- Glitter glue
- Elastic
Each child chose their own crown from the colors I had available. I loved that a lot of the boys picked pink and purple and a few of the girls picked blue.

Let the kids decorate their crowns as they see fit.
Let the glitter glue dry.

Poke a small hole in the bottom corners of the crown.

Measure a piece of elastic that's a two or three inches longer than the distance between the two ends of the crown. Poke a piece of elastic through the holes,

then tie knots in the elastic so that it won't pull back through.

Put the crown on your favorite little head. Or, if your favorite little head is sleeping, use one of her dolls.

Enjoy your DIY prince or princess crown!


JessieLeigh says
These are so cute! I just bought the gold foil ones to decorate for my daughter's princess party... yours are a lot sturdier! 🙂
FeelsLikeHomeBlog says
They are sturdy. The only problem we had was that the elastic pulled through the hole if it wasn't quite long enough. Aside from that, they were perfect.
Cheryl says
Looks like lot of fun! Thank you for linking up!
Malonescotland says
My daughter loves crafts- thanks for this how-to! I especially liked the doll modeling the crown.
Emily/Miss Mommy
ticiaM says
very cute.
eriochrome says
I so should have done this for my daughter's upcoming birthday but I whimpedout and bought a preassembled kit of visors and foamie stickers. The crowns came out super cute!
PS: I am not sure why this is showing up at my husband's blog identity but it's Katie from ABC & 123: A Learning Cooperative. Thanks for linking up!
MamaJennBlogs says
Very cute! My daughter would love these. Thanks for linking up!
MoWrap says
Thanks for the great help. I teach a very small group of k-3rd graders at church. Next Sunday our lession is "WHO IS MY KING". The lesson is fab in teaching them the importance of Jesus being their King about all other things. I am teaching them the 10 Commandments so this story goes perfect with the first commandment and I want them to know they each are princess & princes of a great and mighty King.