
In my poll of readers and Twitter friends, 6 moms said there's no way they'd try to make the cake and 3 said they would try it.
I would think it's clear by now which group I'm in.
I saw the cake and thought, "I could totally make that."
I'm ambitious and creative and patient. I thought the cake was totally impressive, I knew Grace would love it, and I was up to the challenge.
If I weren't pregnant, I think it would have been a lot easier, but it was tough to finish. I'm thankful that my sister was here so that I could walk away when my frustration and morning sickness got the best of me.
A lot of people told me that I was crazy for taking on the princess castle cake, but I was undaunted. My little sister, Amanda, offered to help me, and we planned out 3 weekends in advance of the party to do the flowers, turrets, sugaring, cake baking, and assembly. We had a great plan.
And then the unthinkable happened.
We had to change the date of the party because of a scheduling conflict with some of the grandparents. Our 3 weekends were cut down to one weekend, a busy Saturday (during which Grace and I already had plans), and the morning of the party. It made the preparation a little hectic.
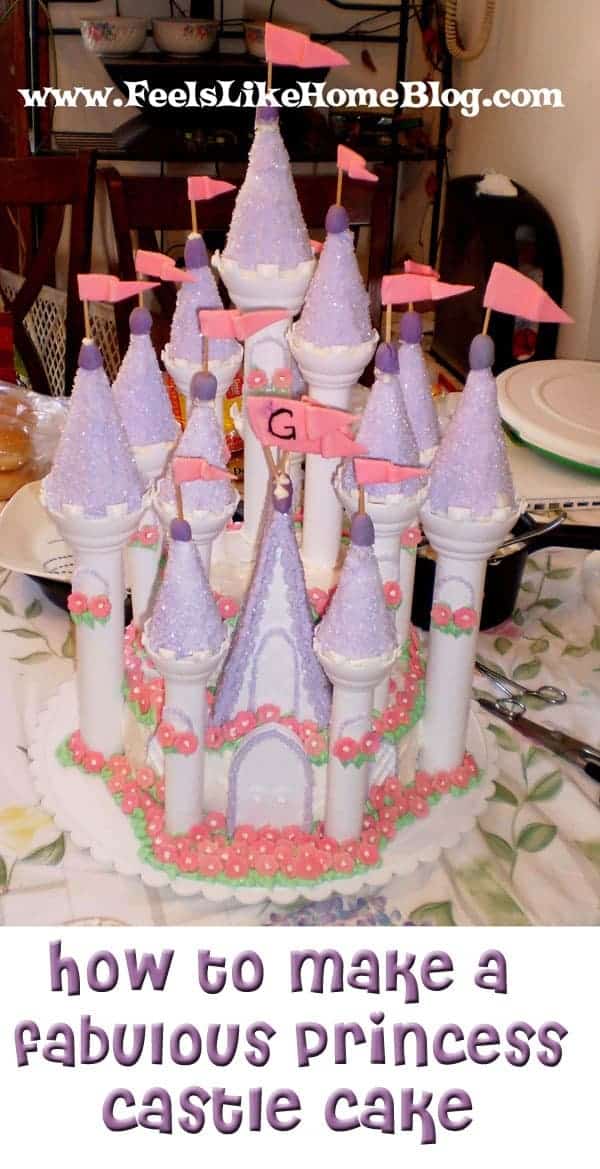
Nonetheless, we made it. The cake was beautiful, and every single person who saw it was duly impressed.
This castle cake did require some special tools, but no special skills to speak of. The instructions on Wilton's website were very good, and partly illustrated. If you want to tackle the Princess Castle Cake, start there.
Here's what we did.
Princess Castle Cake Materials Needed
Food ingredients:
- Cake mix
- Rolled fondant
- White Cake Sparkles - 2-3 packages
- Buttercream frosting
- Royal icing
- Gel food coloring (You CANNOT use liquid food dye that you get at the grocery store! It will ruin your icing!)
- Purple/violet
- Pink/rose
- Kelly green
- White candy melts
- Meringue powder
Tools:
- Princess Castle Cake Kit
- KitchenAid stand mixer
- Decorating tips 2, 3, 5, 8, 12, & 349
- Decorating bags
- Wilton Roll and Cut Mat - You could use any cutting surface, but this one has circles and a grid printed right on, and those guides made it much easier to trip things to the right size.
- Plastic dowel rods
- Non-stick rolling pin
- Tiny flower cookie cutter
- 6x2 and 10x2 inch round cake pans
- Cake circles
- 14 inch round cake base - Get a pretty one. It makes a difference.
- Ruler
Princess Castle Cake - Day One
Everything in this cake was made from scratch (except the fondant), but I don't recommend that because it adds a layer of work that you just don't need. Honestly, I intended to buy a couple of cake mixes, but when it was time to actually do the baking, there weren't any in my kitchen, and the store was closed.
Our plan for the first day of preparation was to tint the fondant, cut out 350 pink fondant daisies, and make royal icing to form the centers of the flowers.
Make Royal Icing
The royal icing was the most complicated, so we started with that.
The recipe provided in the castle kit required 4 cups of sifted powdered sugar, and Grace wanted to help, so I set her up to start sifting.
That would have been really helpful if she had sifted.
Mostly, she tossed powdered sugar around.
When she started eating powdered sugar by the handful, I demoted her from helper to sideline goofball.
After I had the sifting all done, Amanda made the royal icing with my KitchenAid stand mixer.
My advice: buy royal icing.
Tint Fondant
With Grace safely outside with Joe and Amanda working on royal icing, I got to work on the fondant. I bought some, not sure if I'd be able to make it myself. It comes in white; I used gel-style food coloring to dye it pink.
The instructions online said to use food safe rubber gloves to dye the fondant. That's not a joke. My hands were streaked hot pink for four days.
Prepare the Fondant Daisies
After getting the fondant the color I wanted, Amanda used a teeny tiny cookie cutter to cut out the flowers.
And I piped a royal icing center onto each flower using tip 2 and a decorating bag.
It took all day, but finally, we had 350 little flowers finished.
We didn't realize ahead of time that the flowers would fade while they waited to be attached to the cake. They did fade, some dramatically, but it gave them a neat, almost tie dyed look.
Princess Castle Cake - Day Two
Our plan for the second full day of cake preparation was to frost the tower peaks and then to decorate the towers.
We were working really hard, so we didn't take as many pictures.
Frost the Tower Peaks
I dyed the royal icing using purple gel-style food coloring and my KitchenAid stand mixer, and I used that purple icing to frost the peaks. While the icing was still wet, I sprinkled it with cake sparkles.
After the first two peaks were finished, I thought there had to be a better way.
I asked Joe to make me a drying rack for the peaks. He took a cardboard box, stuck 12 wooden skewers in the top, and set it up on our dining room table. I forgot to take a picture, but that drying rack made it so much easier to frost and decorate the peaks.
Decorate the Towers
There wasn't a lot we could do at this point to decorate the towers.
We weren't sure how the royal icing would keep over the course of two weeks, and we didn't want to make the green royal icing just yet.
It turns out that the icing kept nicely, so we could've made the green on Day Two and gotten a little more of the decorating done early on.
Amanda outlined the towers' windows with purple royal icing and tip 5.

She quickly handed them off to me, and I sprinkled them with cake sparkles. The icing dried too much if she did both windows before handing it to me, so we worked on one window at a time.
Make Fondant Flags
I was exhausted, and I needed to take a nap. While I was napping, Amanda decided to make some pretty pink flags out of fondant to attach to the tops of the tower peaks.
And then, she had to put little balls of fondant on top of the peaks to stick the flags into. If we were starting over, I think I'd try to talk her out of the flags next time. They were a real pain.
Princess Castle Cake - Day Three
My mom insisted that I make the cake three days before I needed to assemble it.
Except, three days before I wanted to assemble it was the night we went to the circus. And the night after that, I was just. too. tired. to do it. (I was pregnant, remember?)
That meant I was making the cake the day before I needed to assemble it. Not ideal, but I didn't have any other options.
Bake the Cake
Because he's wonderful, Joe measured the ingredients out and had everything ready for me to put the cake together when I got up in the morning.
Mixing the cake was a family affair. Grace had fun helping me to dump the ingredients into the mixer.
And then, of course, helping me to lick the beater.
The cake batter was delicious, but I think the finished cake was a little too heavy for this particular design. I think a boxed cake mix would have worked a little better.
I poured the cake into two 6-inch cake pans and (what I thought were) two 10-inch cake pans and baked it. (They were actually 8-inch cake pans, which made the final assembly a little more difficult.)
When the cakes were done, I cooled them on a wire cooling rack and wrapped them in kitchen towels, as my mother suggested.
Make Buttercream Frosting
Amanda made this, too, according to the recipe in the cake kit. The KitchenAid made quick work of it, but if doing this again, I'd buy buttercream. One less thing to worry about making from scratch.
Assemble the Cake Layers
Once the cakes are cooled, place the 10-inch cake in the middle of the 14-inch cake base. Frost it with buttercream, and then place the 6-inch cake about ½-inch from the back of the 10-inch cake. Frost that, too. Try to get the frosting smooth.
I thought it would be nice to have a layer of white chocolate in between the cake layers, so I spread some melted white chocolate between the layers as I placed them on the cake board. I wrapped the stacked cake in kitchen towels again when I was finished.
It was a good idea, but that layer of chocolate in the middle of the cake made the finished cake too rich.
Assemble the Towers
In order to make the final assembly a little easier, I cut plastic dowel rods to the correct size, a half-inch shorter than the cake layer they would sit on top of. Then, I attached the plastic dowels to the towers using melted white chocolate.
The instructions said to refrigerate the assembled towers, but I thought they'd be okay since they were going to sit over night. This may have been a mistake.
Princess Castle Cake - Day Four
This was party day, and I was exhausted. We'd been swimming all day the day before, and I took Grace to a birthday party. I woke up feeling like I needed to take a nap.
Make Green Royal Icing
This happened in the same way as before, except that Amanda dyed it green when she first got started.
Assemble the Cake Towers
This was the hardest step of the whole process, in my opinion.
I put the towers into the cake. Some of the towers broke off of the dowels I'd attached the day before. (Would cooling or freezing them have made a difference? I don't know since I didn't do it.) I got very frustrated with them. I had pillars propped up with bowls and stuck to things with frosting.
Remember that my cakes were smaller than they were supposed to be? Some of the towers were too close to the edge of the cake. They made the cake crumble around themselves.
Fortunately, Amanda rescued me because I was ready to walk away at this point. She helped me to build the cake back up with frosting and white chocolate.
Once they were stable, I cemented the peaks on top of the towers with white chocolate.
And then I really did walk away. I couldn't take any more. I was tired and cranky, and I went to clean the living room for the party and Amanda mercifully finished the cake.
Attach the Fondant Daisies
Amanda piped a zigzag of green icing all around the cake using tip 12, to cement the flowers to, then added green leaves all around the cake with tip 349. Next to each leaf, she added a daisy.
Because we'd done things slightly out of order, it was tough for her to reach some of the places on the cake that were supposed to have leaves and flowers.
A resourceful girl, she used a pair of scissors and later, a hemostat, to get the flowers into their spots.
The towers were easy to decorate, and they turned out nicely when loaded with flowers.
At long last, it was party time!
The cake was impressive sitting on the table.
Princess Castle Cake - At the Party
There was no place on the cake to put candles. I considered sticking them in the side, and then decided instead, to make a candle holder from a mound of leftover buttercream. It had been sitting long enough to be slightly stiff. It worked to hold the candles upright for the 5 minutes I needed them.
Did I mention that Grace adored her cake?
Of course she did.
But I don't know if we'll be making another one.
It was an insane amount of work, even with two of us working on it.


Alicia says
That is gorgeous! I'm inspired to try it.